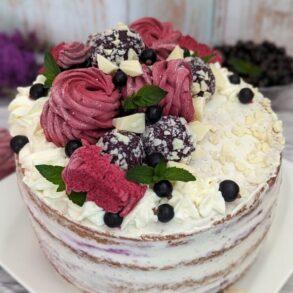
Semi naked cake with currants and white chocolate
The semi naked cake tastes fruity, summery and light. It consists of a fluffy moist chiffon sponge cake, a tender cream cheese and cottage cheese cream with white chocolate and sweet tart black currant jelly. With this recipe you can make the semi naked cake at home.
Servings 12
Equipment
- Ø 20 cm springform tin
- piping bag with star nozzle optional (for decorating)
Ingredients
for the sponge cake
- 6 eggs
- 235 g sugar**
- 75 ml hot water
- 65 ml vegetable oil
- 40 g cornstarch**
- 235 g flour**
- 10 g baking powder**
- 1 pinch of salt
for the cream
- 150 g white chocolate
- 375 g cream cold
- 225 g cream cheese cold
- 190 g cottage cheese cold
- 35 g powdered sugar**
- 1 pinch of vanilla bean**
for the fruit jelly
- 300 g black currants
- 75 g sugar** or to taste
for decorating (optional)
- blackcurrant zephyr according to this recipe
- white chocolate coarsely chopped
- black currants
- fresh peppermint leaves
Instructions
Preparation of the sponge cake
- Line the baking tin with baking paper so that the paper is about 3 cm above the edge of the tin.
- Mix flour with cornstarch and baking powder.
- Beat eggs, sugar and salt for about 7 - 10 minutes until you get a light and airy mix.
- Fold the flour mix into the egg sugar mix to make an airy batter.
- Pour hot water and vegetable oil to the batter and mix gently and briefly to form an airy thick batter.
- Pour the batter into the baking tin and bake the sponge cake in a preheated oven at 338 °F (170 °C) for about 55 minutes.
- Allow the sponge cake to cool briefly in the baking tin, take it out and let it cool completely with the surface facing down on a kitchen rack.
Preparation of the fruit jelly
- Place black currants and sugar in a saucepan and heat slowly over low heat, stirring, until sugar is dissolved.
- Bring the fruit mix to a boil and simmer, stirring occasionally, until the berries are soft, about 3 - 5 minutes.
- Puree the currant mix with a hand blender and then pass it through a sieve.
- Let the fruit jelly cool.
Preparation of the cream
- Melt white chocolate slowly and let it cool to lukewarm.
- Whip cream with powdered sugar and vanilla until creamy.
- Stir cream cheese and cottage cheese into the whipped cream at medium speed of the mixer.
- Pour the white chocolate into the cream mix and continue to whip it only now at high speed of the mixer to a homogeneous solid cream.
Preparation of the cake
- Cut off the top of the sponge cake and crumble it.
- Gradually add a small amount of fruit jelly and a little cream to the crumbs, kneading them with your hands until you get a well malleable mass, like for cake pops.
- Form small balls from the crumb mix, roll them in chopped white chocolate and chill them for a while.
- Cut the sponge cake longways into four equally thick cake layers.
- Spread a thin layer of fruit jelly on the cake layers.
- Spread three of the four cake layers generously with the cream, leaving about 0.5 - 1 cm to the edge everywhere. Leave some cream for the top, sides and to decorate the cake.
- Stack the three cake layers with the cream on top of each other.
- Place the fourth cake layer on top last, fruit jelly side down.
- Spread the cream on the top and very thinly on the sides of the cake.
- Chill the cake for about 15 minutes.
Decorating the cake
- Spread the cream again very thinly on the sides of the cake, removing the excess cream with a spreading knife so that the sponge remains visible in places.
- Fill the remaining cream into a piping bag with a star-shaped nozzle and pipe roses onto the cake.
- Chill the cake for about 2 hours.
- Spread the crumb balls, zephyr, black currants, chopped white chocolate and mint leaves on the cake and serve.
Notes
- It is best to cut the sponge cake the next day. Bake it the day before, if possible, let it cool completely and store it overnight in an airtight container at room temperature.
- Instead of fruit jelly, you can use a tart jam, such as blackcurrant jam. Alternatively, you can use any fresh fruit. Then spread them on the cream before stacking the cake layers on top of each other.
- You can decorate the semi naked cake as you like, depending on the occasion you want to serve it for.
- Note the detailed tips and tricks for making the semi naked cake at the top of the post.