
Dieser Beitrag ist auch verfügbar auf:
![]() Deutsch
Deutsch
Very chocolaty, moist, creamy, tender and incredibly delicious tastes this tree stump cake. With its fancy appearance in the shape of a tree stump, it is a fabulous eye-catcher on the dining table and fits perfectly for any party, for example at Christmas or for a child’s birthday. Here I’ll show you a easy tutorial to make and decorate the tree trunk cake yourself. A detailed tree stump cake recipe with exact quantities and step-by-step instructions can be found here at the very bottom.

What is the tree stump cake made of?
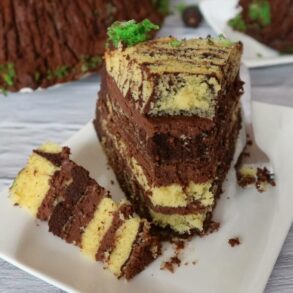
The tree trunk cake is made of a combination of the classic and chocolate sponge cake. It tastes fluffy, moist, soft and looks like a stump from a felled tree from above.
The cream for the tree stump cake is made with cream cheese and chocolate. It tastes very tender, not too sweet and chocolatey.

For all lovers of chocolate cakes
The tree stump cake tastes heavenly chocolaty. It is ideal especially for all lovers of chocolate cakes.
The cake cream is a chocolate cream and is made with dark chocolate and additionally with cocoa powder. The cake base is also partly made of a chocolate sponge. So much chocolate flavor contains this delicious tree trunk cake.
Not only for Christmas
In some countries, the tree stump cake is part of the traditional Christmas cake. But since it is very versatile in terms of its decoration, you can make it for any celebration.
Children will surely be happy if you serve the tree trunk cake at a children’s birthday party. Just decorate it accordingly, for example with homemade mushroom cookies.

Make tree stump from the cake
There are countless instructions on how to turn a simple cake into a tree stump. Some of them are very elaborate, so you need to have some cake decorating experience to pull off a tree stump cake like this.
I decorated my tree trunk cake very easy. You’ll definitely get it done without much baking skills.
To make the cake look like a tree stump from above, the cake base was baked from a combination of the classic and chocolate sponge cake. I shaped the bark of the tree stump with a wooden skewer. It was then dusted with matcha tea, cocoa powder and powdered sugar to make it more like the bark of an old tree stump.
I also baked a rough pored sponge in green to represent moss on the stump. You can leave out the moss, though.
Of course, you can decorate the cake to your taste and turn it into a tree trunk. There are no limits to your imagination.

This tree trunk cake is
- chocolatey,
- creamy,
- moist,
- soft,
- fluffy,
- not too sweet,
- tender,
- heavenly delicious,
- a fabulous eye-catcher on the dining table,
- ideal for Christmas or any other celebration,
- appropriately decorated for children’s birthday perfect,
- easy to make from common ingredients.

How to make tree trunk cake yourself: tips and tricks
- The cake does not taste too sweet. If you like it sweeter, add more powdered sugar to the cream and more sugar to the batter.
- Use good quality dark chocolate with a high cocoa content for the cake cream.
- All ingredients for the cream should be about the same temperature so they can combine well. Especially butter and cream cheese should be as warm as a room. The hot mixture of cream and chocolate should also be cooled to room warm.
- You can also decorate the cake differently according to your taste.
- To bake the sponge cake layers, you will need a Ø 24 cm and Ø 20 cm baking springform pan.
- Use a wooden skewer to test whether the two sponge cake layers are baked. To do this, insert a wooden skewer briefly into the center of each sponge cake and see if it stays almost clean after coming out. If the wooden skewer remains smeared in raw dough, you still need to bake the sponges. If only a few moist crumbs remain on the wooden skewer, the sponges are done. If the wooden skewer comes out dry, it could be that you baked the two sponge cake layers too long, and they end up tasting too dry.
- It’s best to let the sponges rest overnight. The next day they will be easier to slice into multiple cake layers, the cut will be clearer and look more like the stump from a felled tree.
- Store the tree stump cake in the refrigerator. It will keep for about 3 days.

Did you make the tree stump cake yourself using this recipe? I look forward to your result, your star rating and your comment on the recipe below, how you succeeded and tasted the tree trunk cake.
Got an appetite for more delicious and pretty cakes? Try also:
- Cake “Damskie palchiki” – recipe for popular Russian choux cake
- Cream puff cake with cherries or raspberries – recipe
Tree stump cake / tree trunk cake
Equipment
- Ø 24 cm baking pan
- Ø 20 cm baking pan
Ingredients
for the dough
- 6 eggs
- 200 g sugar
- 250 ml vegetable oil
- 125 ml hot water
- 335 g + 40 g flour
- 20 g cocoa powder
- 15 g baking powder
- vanilla
- 1 pinch of salt
- butter for greasing the baking forms
for the cream
- 420 g cream cheese (as warm as room temperature)
- 220 g butter (as warm as room temperature)
- 100 g cream
- 120 g powdered sugar
- 170 g dark chocolate
- 50 g cocoa powder
for the moss (alternative)
- 1 egg
- 30 g sugar
- 20 g flour
- 5 ml vegetable oil
- 5 g baking powder
- green food coloring
for decorating (alternative)
- matcha tea
- cocoa powder
- powdered sugar
Instructions
Preparation of the dough
- Line the bottom of the two (Ø 20 cm and Ø 24 cm) springform pans with baking paper and grease the edges with butter.
- Beat the eggs, sugar and salt to a fluffy white mixture.
- Add vanilla and vegetable oil in portions and beat to a homogeneous fluffy mass.
- Add hot water in portions and whip again to a homogeneous fluffy mass.
- Fold in 335 g flour with baking powder to make a fluffy, thick batter.
- Pour 1/3 of the batter into a clean mixing bowl and fold in cocoa powder. Add 40 g of flour to the remaining 2/3 of the batter.
- Place the two cake pans next to each other, put 1 tablespoon of chocolate dough in the center of each cake pan, put 2 tablespoons of light sponge dough in the center of each cake pan, put 1 tablespoon of chocolate dough on top and then 2 tablespoons of light sponge dough. Repeat the procedure until both doughs are used up. This will give you a pattern of the two doughs in each baking pan, reminiscent of the stump of a felled tree.
- Bake the two cakes in a preheated oven at 180 °C top and bottom heat for about 25 minutes, then let them cool to warm in the baking pans, take them out of the baking pans and let them cool completely overnight.
- Cut off the curves of the two cakes and crumble them finely.
- Cut the two sponge cakes lengthwise into two cake layers of equal thickness, so that you end up with two large and two small cake layers in diameter.
Preparation of the cream
- Heat the cream and dissolve the dark chocolate in it. Let the chocolate mixture cool to room temperature.
- Beat softened butter and powdered sugar for about 4 - 5 minutes until creamy white.
- Add cream cheese and beat again until creamy.
- Add the cooled chocolate-cream mixture and whip it briefly to a homogeneous chocolate cream.
Preparation of the moss (alternative)
- Beat egg and sugar to a fluffy white mass.
- Add green food coloring and whisk to a homogeneous fluffy green mass.
- Fold in flour with baking powder to make a fluffy, thick batter.
- Fold in vegetable oil.
- Fill paper cups or muffin tins about 1/3 full with the batter, bake the small cupcakes in the microwave at 800 watts for about 50 seconds (Depending on the power of your microwave, the baking time may vary.) and let them cool.
- Break up the coarse-pored green small cupcakes into pieces to use for decorating the cake.
Shape the cake
- Add some of the chocolate cream in portions to the sponge crumbs and knead it by hand into a homogeneous mass, about the consistency of a dough. Put it in a cool place while you don't need it.
- Pour some of the chocolate cream, which you will later use to coat the edge of the cake, into a clean small mixing bowl and refrigerate it as well while you don't need it.
- Spread the remaining chocolate cream generously on the two large cake layers and the small bottom cake layer. Stack the large cake layers on top of each other, place the small cake layer with the cream on top, and place the small cake layer without cream on top last.
- Take out the "chocolate modelling clay" from the fridge and stick it on the edge of the cake, so that the cake gradually turns into a stump, also form roots of the tree from the "chocolate modelling clay". Chill the cake for about 30 minutes so that the edge becomes firm.
- Then spread the edge of the cake with the chocolate cream that you have chilled (simply apply the cream to the "chocolate modelling clay") and make patterns on the cream with a wooden skewer, reminiscent of the bark of a tree, chilling the cake again and again briefly if the cream becomes too soft. Then chill the cake for about 2 hours.
- Dip a small baker's brush alternately in matcha tea, cocoa powder and powdered sugar and apply it very lightly and thinly to the edge of the cake, so that it gets more and more the look of an old stump.
- Alternatively, decorate the cake any way you like with the green "moss" you baked.
Notes
- The amount of powdered sugar for the cream and the amount of sugar for the dough can be adjusted to taste. With the quantities in the recipe, the cake will not taste too sweet.
- Use good quality dark chocolate with a high cocoa content for the cake cream.
- All ingredients for the cream should be about the same temperature so they can combine well. Especially butter and cream cheese should be room warm. The hot mixture of cream and chocolate should also be cooled to room temperature.
- The cake can be decorated as desired.
- Use a wooden skewer to test if the two sponge cake layers are done baking.
- It is best to let the sponge cakes rest overnight. The next day they are easier to cut into several cake layers, the cut is clearer and looks more like the stump from a felled tree.
- The time for baking the "moss" is not included in the preparation time.
- Note the detailed tips and tricks for DIY the tree stump cake at the top of the post.