
Dieser Beitrag ist auch verfügbar auf:
![]() Deutsch
Deutsch
Nutty crunchy meringue layers and delicate chocolate-flavored butter cream make the Kiev cake a unique taste experience. It is not without reason that it has been one of the most popular Ukrainian cakes since the Soviet era. Meanwhile, you can easily make it at home. You can find a detailed Kiev cake recipe with the exact quantities and step-by-step instructions here at the bottom.
History of Kiev cake
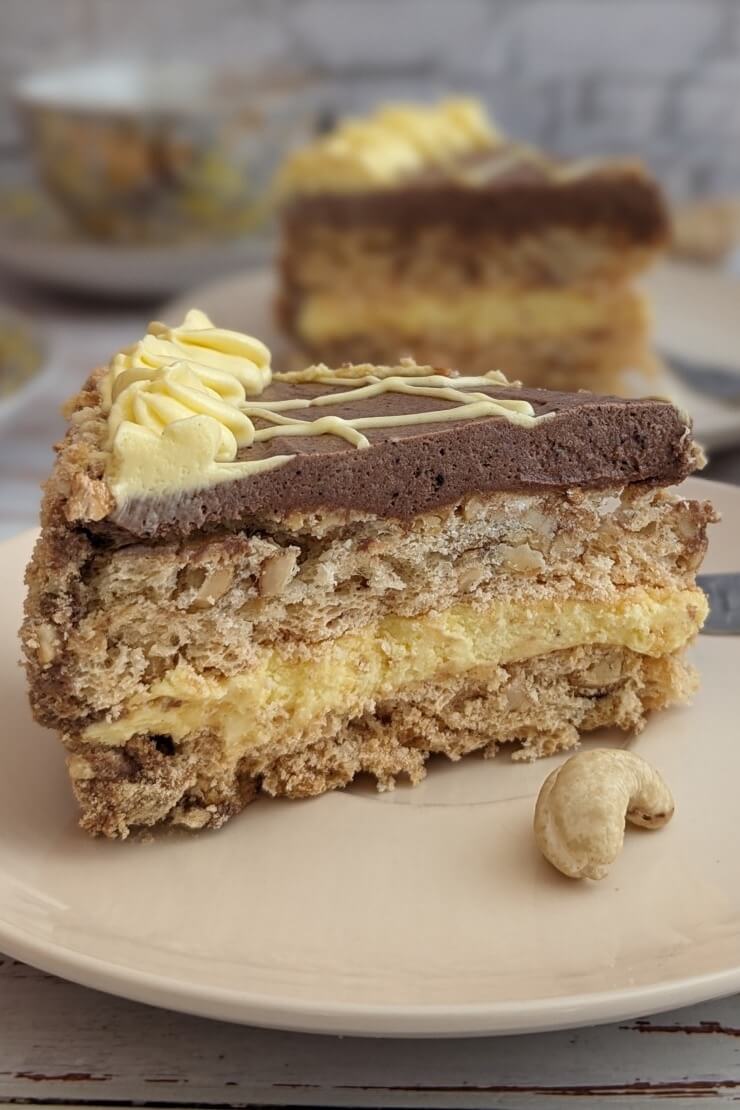
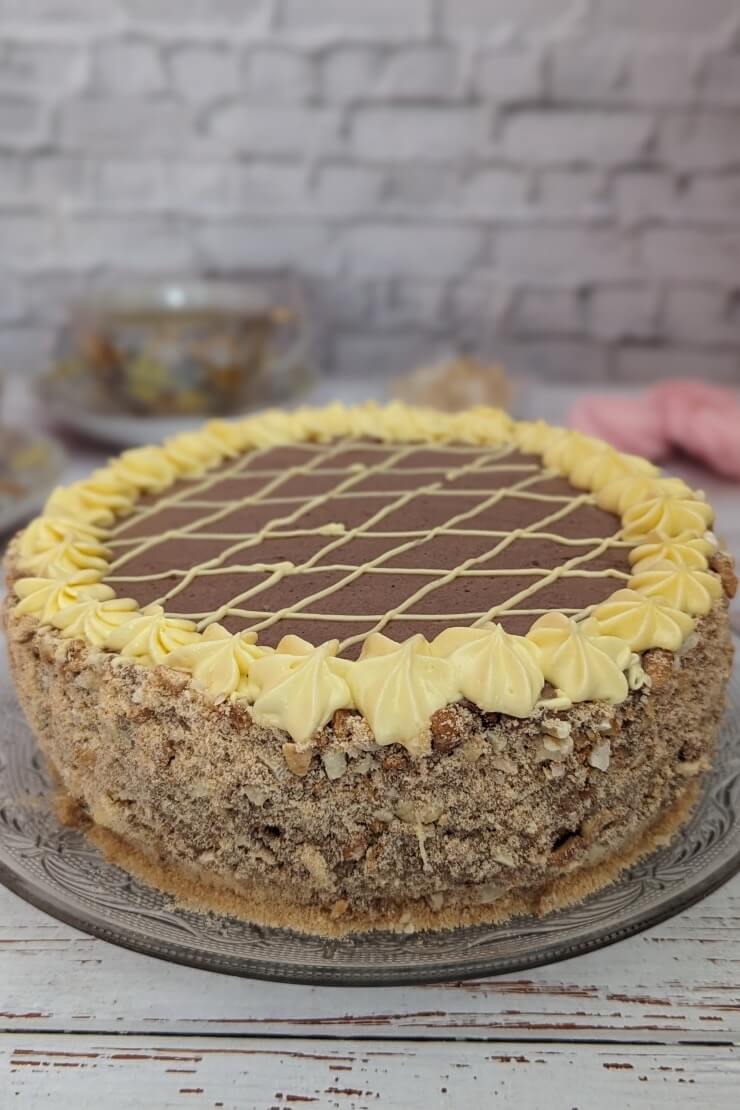
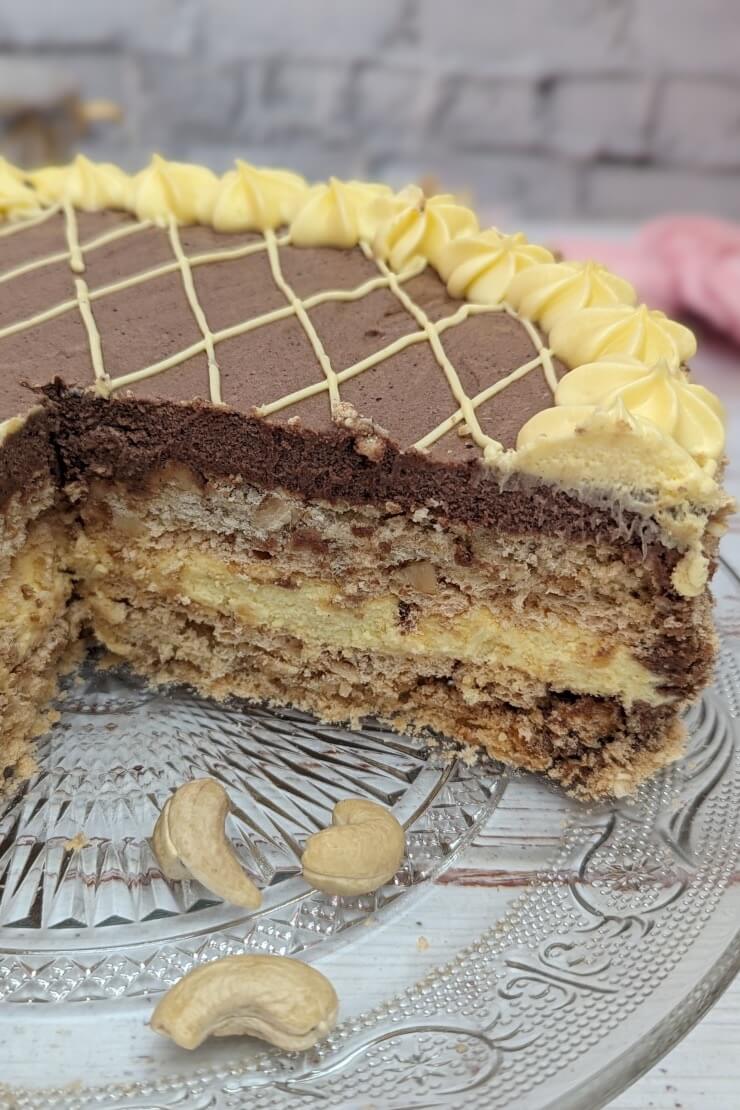
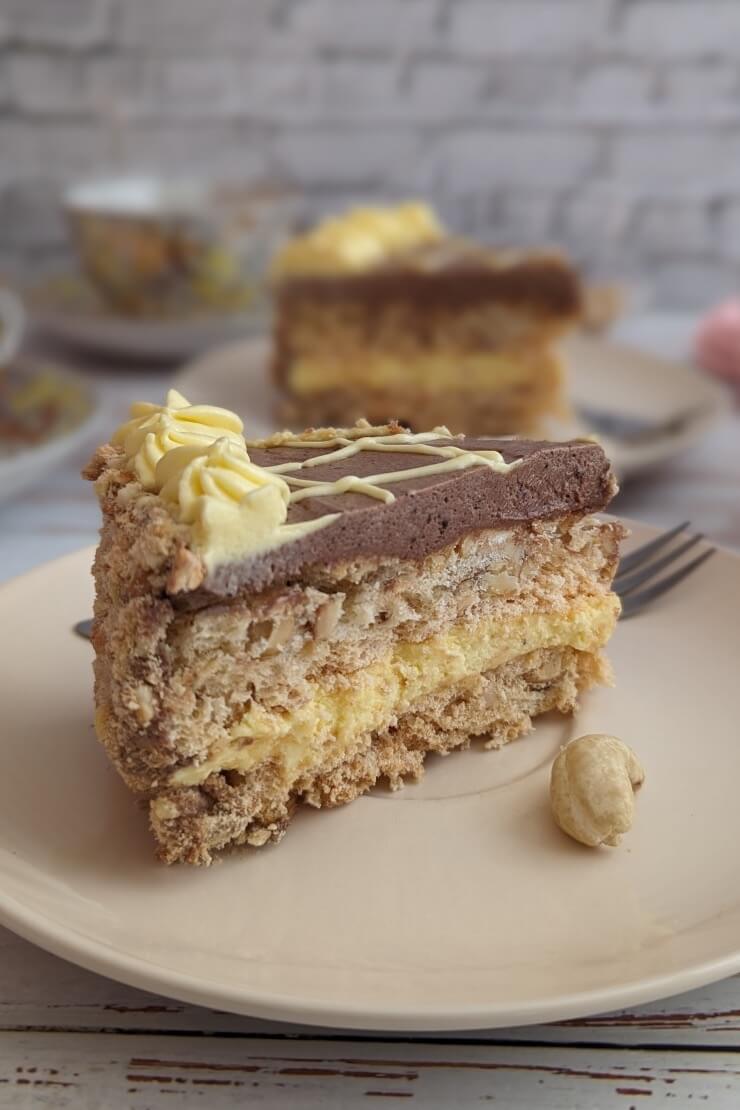
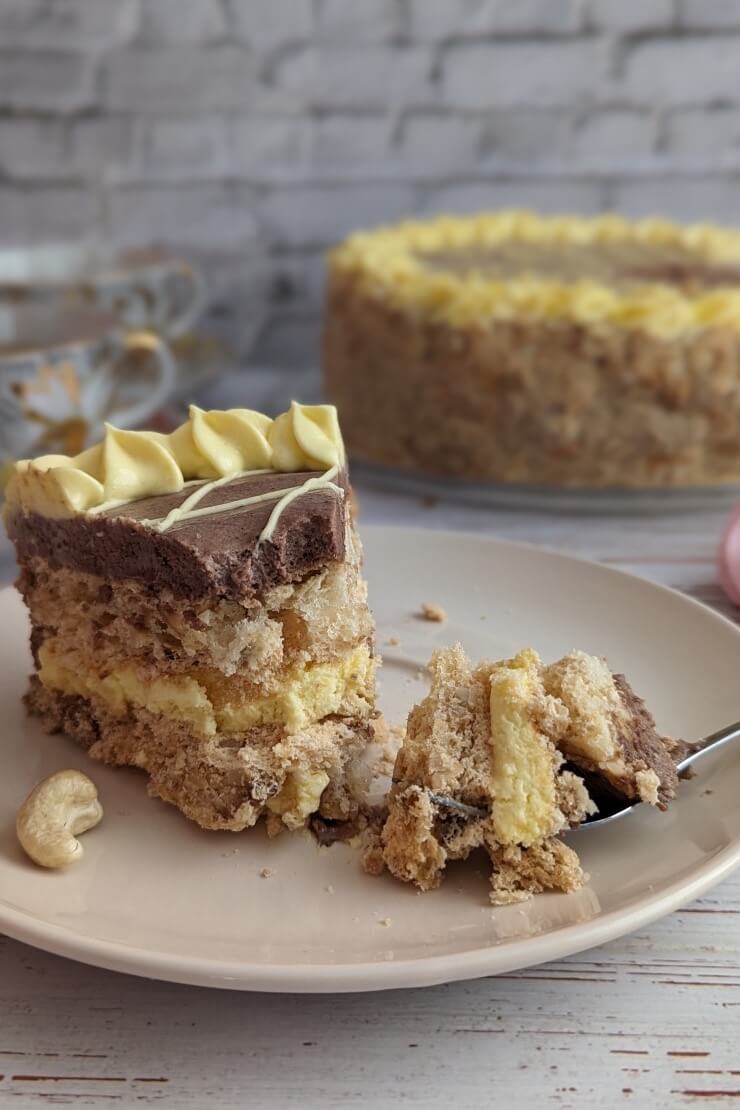
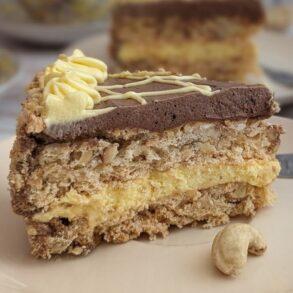
Kiev cake is probably the most famous Ukrainian cake. It consists of two nut meringue bases, a layer of butter cream “Charlotte” and a layer of chocolate butter cream.
The cake was created in 1956 in the Karl Marx confectionery factory. The recipe was kept secret for years, just like for example for the Pancho cake.
Soon the cake, along with the cake “Charodeyka” and the cake “Skazka”, enjoyed great popularity throughout the Soviet Union. It also became the symbol of the city of Kiev.
During the Soviet period, the offer of the Kiev cake in pastry shops was limited. To get to the delicious dessert, one had to endure an hour-long queue, similar to the one for the Wenceslas cake and the cake “Slavyanka”.
On every special occasion people tried to get the cake. They even traveled to Kiev just to buy it. The Kiev cake, which was packed in a beautifully painted round cardboard box, was brought back to friends and acquaintances as a gift from a trip to Kiev.
What nuts?
According to the original Soviet recipe, Kiev cake was prepared with cashews. In many recipes people take hazelnuts as an alternative, as for the sponge cake for the hazelnut cake “Zhuravushka”. Walnuts are also sometimes used.
With cashews you get light meringue layers, which are very tender. With walnuts they become dark and rather a bit firmer.
Often people make the Kiev cake with a mix of nuts. For example, you can combine cashews and walnuts or hazelnuts and cashews.
Ways to bake nut meringue layers
You can bake the nut meringue layers for the Kiev cake in two springform tins as well as on one oven tray. You will need two identical cake layers, 20 cm in diameter, and possibly some leftovers that you can crush into crumbs and sprinkle on the sides of the cake.
I used a Ø 20 cm and a Ø 24 cm springform tin this time. This gave me one small and one large cake layer. After baking, the large meringue layer was cut the same size with the small one. I then used the resulting meringue leftovers for the sides of the cake.
If you have two Ø 20 cm springform tins, you can also use them. Then you get directly two identical meringue bottoms. From a small amount of meringue you can also bake a small meringue piece and crumble it afterwards. Or you can simply sprinkle the edge of the cake with any chopped nuts.
Alternatively, you can place two cake rings on an oven tray lined with baking paper, spread the meringue in them and bake.
Or you can draw two circles of the same size on a sheet of baking paper, place it on an oven tray and spread the meringue in the shape of circles. After baking, you can cut off any bumps on the cake layers and turn them into crumbs.
Note that if you do not line the inside of the springform tin or cake ring with baking paper, you will have to separate the meringue layers from it later with a sharp knife. Greasing the baking tin will not help here.
The Kiev cake is
- crispy,
- creamy,
- nutty,
- chocolatey,
- sweet,
- fluffy,
- heavenly delicious,
- with cashews,
- with nut meringue layers,
- with butter cream and chocolate butter cream,
- easy to make, but with a certain amount of time,
- ideal for a round of coffee with the family or for a special occasion,
- most popular cake of Ukrainian cuisine.
Split Kiev cake recipe over two days
The Kiev cake recipe that you can find here at the end of the post in the recipe box is not difficult, but it does require a certain amount of time. If you want to make the cake for a special occasion, you should start preparing it a couple of days in advance, similar to the mini cakes “Bouchee”.
This is because the cake layers need to rest at room temperature for about 24 hours. Also, the finished cake must sit in the refrigerator for at least 5 hours.
Step 1:
So on the first day, make the nut meringue layers.
For the meringue, whip egg whites with sugar until stiff and then fold in the mixture of flour, chopped cashews and sugar.
Then make two cake layers with the meringue and dry them in the oven for about 2 – 2.5 hours. After that, let them cool at room temperature and leave them until the next day.
Step 2:
Now you can make the cream. It is similar to the cream for Leningradsky cake.
You cook egg yolks, sugar and milk briefly to a slightly thickened mixture and let it cool to room temperature. Then whip soft butter until fluffy and stir in the egg yolk milk mixture in batches.
Divide the butter cream into two portions. Add cocoa powder to one of the portions to make a chocolate butter cream.
Step 3:
Now you can start assembling the cake.
Spread the light butter cream on one of the nut meringue layers. Place the second cake layer on top and spread the chocolate butter cream on it. You can sprinkle the sides of the cake with the resulting meringue crumbs or with nuts.
Decorate the Kiev cake as desired and refrigerate it overnight.
How to make Ukrainian cake: tips and tricks
- You should bake the cake layers immediately after the nut meringue mixture is ready. It should not rest, otherwise it may collapse.
- You can also bake the cake layers directly on an oven tray. Read more about that here above.
- The drying time of the nut meringue layers given in the recipe may differ in your case. Check after about 1.5 hours if the cake layers are ready.
- Stir the egg yolk milk mixture on the stove continuously so it doesn’t burn. Also, heat it over medium or low heat, not high heat, so the egg yolks don’t curdle.
- Butter and the egg yolk milk mixture for the cream need to be room warm and both about the same temperature so they can combine well when whipped.
- Instead of vanilla bean, you can use vanilla sugar or vanilla extract for the cream.
- You can omit rum from the cream.
Kiev cake video recipe
By the way, on my Youtube channel you can find a short video for the Kiev cake. There you can see exactly how to make it. If you don’t want to miss any more videos from me, feel free to subscribe to my channel.
Did you make the Kiev cake using this recipe? I’m looking forward to your result, your star rating and your comment here below, how you succeeded and tasted the Ukrainian classic.
Looking for more delicious sweet recipes from Ukrainian cuisine? Try some more:
- Cake “Slavutych” – forgotten pearl from the Soviet era
- Khreshchatyk cake – from the treasure chest of Soviet cake recipes
- Apple-cherry solozhenik – recipe for old Ukrainian dessert
Kiev cake
Equipment
- Ø 20 cm and Ø 24 cm springform tin
- piping bag with star nozzle and narrow hole nozzle optional (for decorating)
Ingredients
for the nut meringue layers
- 150 g cashew nuts
- 6 egg whites
- 180 + 50 g sugar
- 50 g flour
- 1 pinch of vanilla bean
- 1 pinch of salt
for the cream
- 250 g butter room warm
- 170 ml milk
- 170 g sugar
- 6 egg yolks
- 10 g cocoa powder
- 1 tbsp rum optional
- 1 pinch of vanilla bean
for the edge
- 30 g cashew nuts roasted
- meringue crumbs
Instructions
Preparation of the nut meringue layers
- Line a Ø 20 cm and a Ø 24 cm springform tin with baking paper.
- Roast cashews in a pan or in the oven, let them cool down and chop them coarsely.
- Mix flour, the chopped cashews, 180 g sugar and vanilla.
- Briefly beat egg whites with salt until foamy.
- Add 50 g sugar in portions and beat until stiff.
- Fold the flour nut mixture into the egg white mixture so that it remains firm (in no case becomes liquid!).
- Pour a little more than half of the nut meringue batter into the Ø 24 cm springform tin and smooth it out. Pour the remaining batter into the Ø 20 cm springform tin and smooth it down as well.
- Bake the two nut meringue layers together in a preheated oven at 266 °F (130 °C) for about 2 - 2.5 hours, until they are dry on the outside and inside. You can check by tapping them with a finger.
- Then carefully remove the nut meringue layers from the baking tins, remove the baking paper, let them cool and rest at room temperature for about 24 hours.
- Place the small cake layer on top of the large one, and carefully cut off the edge of the large cake layer with a sharp knife so that the two cake layers are the same size.
- Put the resulting meringue crumbs and 30 g of roasted cashews in a blender and grind them. Put it aside for now, you will need it later for the sides of the cake.
Preparation of the cream
- Put egg yolks, sugar and milk in a thick-bottomed saucepan and stir thoroughly.
- Place the saucepan on the stove and bring the egg yolk milk mixture to a boil over medium heat, stirring constantly.
- Then continue to cook it over low heat, stirring constantly, for about 2 minutes while it thickens slightly.
- Let the egg yolk milk mixture cool to room temperature, stirring occasionally.
- Beat softened butter and vanilla until light and fluffy, about 5 minutes.
- In batches, add the egg yolk milk mixture to the butter, beating briefly each time to form a homogeneous cream.
- Add rum to the cream and whip again briefly.
Preparation of the cake
- Optionally, transfer a few tablespoons of the cream into the piping bag if you want to decorate the cake with it later.
- Spread about half of the remaining cream evenly on one of the two nut meringue layers.
- Place the second nut meringue layer on top.
- Add cocoa powder to the second half of the cream and mix it into a homogeneous chocolate butter cream.
- Spread the chocolate butter cream on the second nut meringue layer, leaving a small amount for the sides of the cake.
- Spread the sides of the cake with the remaining chocolate butter cream and sprinkle with the nut meringue crumbs you set aside earlier.
- Decorate the cake with the light cream in the piping bag and chill for 5 - 6 hours.
Notes
- You should bake the cake layers immediately after the nut meringue mixture is ready. It should not rest, otherwise it may collapse.
- You can also bake the cake layers directly on an oven tray. Read more about that here above.
- The drying time of the nut meringue layers may differ in your case. Check after about 1.5 hours if the cake layers are ready.
- Stir the egg yolk milk mixture on the stove continuously so it doesn't burn. Also, heat it over medium or low heat, not high heat, so the egg yolks don't curdle.
- Instead of vanilla bean, you can use vanilla sugar or vanilla extract for the cream.
- Note the detailed tips and tricks for making the Kiev cake at the top of the post.
If you are using Pinterest, you can pin the following picture:
